Brilliant Wall Panelling Ideas to Transform Your Space in Style
Wall panelling is back—and it’s bolder, smarter, and more beautiful than ever. Whether you want to add charm to a dated hallway or inject modern elegance into your living room, today’s wall panelling ideas offer endless possibilities. From functional benefits to jaw-dropping designs, we’re diving deep into the stylish world of wall panelling. If you’re looking to enhance thermal comfort while updating aesthetics, consider incorporating
into your next renovation.
Let’s uncover why wall panelling is one of the most impactful upgrades for any home interior.
Why Wall Panelling is the Interior Upgrade You Didn’t Know You Needed
Wall panelling isn’t just about pretty patterns—it’s a multifunctional design tool with big benefits. Here’s what makes it a smart choice.
Practical Perks That Make a Difference
- Thermal Insulation: Wall panels add an extra layer of warmth, helping your space stay cozy while lowering heating bills.
- Sound Absorption: Acoustic panels reduce echoes and noise transfer, making them ideal for bedrooms, offices, or apartments.
- Wall Protection: High-traffic areas stay cleaner and scuff-free thanks to durable panels that take the brunt of daily wear.
- Hide Imperfections: Cracked plaster or uneven walls? Panelling is a stylish solution that covers flaws effortlessly.
Easy to Maintain and Built to Last
Most modern wall panelling materials are resistant to wear, making them easy to clean and hard to damage. That’s beauty and brawn in one. Choosing the right
can help tie together your furniture and overall interior palette.
Wall Panelling Ideas That Are Setting 2025 Interior Trends
Wall panelling has evolved far beyond the old-fashioned wainscoting of yesteryear. Today’s trends are bold, textured, and tailored to every taste.
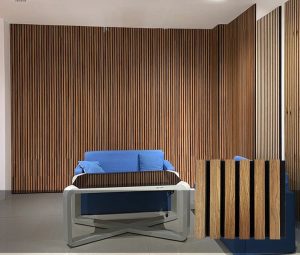
Texture Talks: Natural, Fluted, and 3D Panels
One of the hottest wall panelling ideas this year is texture. Think:
- Wood grain for rustic charm
- Fluted slats for a Scandi-modern feel
- 3D geometric panels that create a sculptural effect
These textures don’t just look good—they feel good too, adding a tactile layer to your interiors.
Classic Revival: Victorian and Heritage Styles
Love the timeless feel of period properties? Wainscoting, raised panels, and shaker-style mouldings are making a comeback. These classic wall panelling ideas add elegance to dining rooms, hallways, and home libraries, giving your space a sense of grandeur.
Vertical Thinking: Stretch Your Space
Vertical slats are more than just on-trend—they make ceilings feel higher and rooms appear larger. Opt for natural wood tones or matte black for a dramatic finish that works in bedrooms, lounges, and even bathrooms.
Cost, Installation, and DIY Tips: What to Expect
While wall panelling can seem high-end, it’s often surprisingly budget-friendly.
What You’ll Pay
Prices vary based on material and design:
- MDF panels: Budget-friendly, starting from £15 per square metre.
- Premium wood or acoustic panels: Up to £150 per square metre.
- Installation costs: Around £30 per hour for professional services.
If you’re DIY-savvy, you can save significantly by handling installation yourself.
DIY or Hire a Pro?
Some wall panelling ideas are perfect for weekend warriors—especially peel-and-stick or tongue-and-groove panels. But for complex layouts or ornate mouldings, hiring a professional ensures a flawless finish. Experts recommend using
in open-plan areas to create a sense of zoning without building walls.
Creative Wall Panelling Ideas by Room
Need room-by-room inspiration? Here are tailored wall panelling ideas for every part of your home:
- Living Room: Try full-height fluted panels in a bold color for a feature wall that stuns.
- Bedroom: Install soft acoustic panels behind the bed for visual appeal and sound absorption.
- Hallway: Add half-wall panelling with hooks or rails for a blend of style and function.
- Bathroom: Use moisture-resistant panels in vertical designs for a spa-like feel.
These wall panelling ideas prove there’s no wrong room for a panelled upgrade.
Quick Tips for Choosing the Right Panel Style
- Match the panel style with your overall decor—modern, rustic, or classic.
- Choose colors that either blend in or boldly contrast with your walls.
- Always measure your walls accurately before buying panels.
- Don’t forget finishing touches like trim, paint, or stain for a polished look.
Frequently Asked Questions About Wall Panelling
Q: Can I install wall panelling on uneven walls?
A: Yes! Wall panelling can be a clever way to cover imperfections, though some prep work may be required for very uneven surfaces.
Q: Is wall panelling suitable for small rooms?
A: Absolutely. Vertical panels can make a small room feel taller, while painted panels in lighter tones open up the space.
Q: How durable is wall panelling?
A: Very durable. With proper care, high-quality panels can last for decades without showing wear.
Q: Can I paint my wall panels?
A: Yes, especially if they’re MDF or wood. Use primer and high-quality paint for the best finish.
Q: Are there eco-friendly wall panelling options?
A: Definitely. Many brands now offer panels made from recycled wood or sustainable materials.
Wall panelling ideas have exploded in variety and accessibility. Whether you’re chasing classic charm or modern minimalism, the right wall panels can elevate your space both visually and functionally. With smart choices, a little creativity, and perhaps a DIY mindset, your walls can go from basic to breathtaking.