Shipping a car to Oregon can be a complex task if you’re not familiar with the process. Whether you’re relocating for school, work, or personal reasons, understanding the best car shipping practices in Oregon is essential to ensure your vehicle arrives safely, on time, and without unexpected costs. This article covers everything you need to know, from choosing a reputable auto transport company to preparing your car for shipment and navigating Oregon’s specific regulations.
Choosing the Right Auto Transport Company
The foundation of a successful car shipment is selecting the right auto transport provider. When shipping to Oregon, look for companies that have a strong track record, proper licensing, and positive customer reviews. The Federal Motor Carrier Safety Administration (FMCSA) maintains a database of licensed auto transporters, which can be a valuable resource to verify the legitimacy of any company. Avoid companies that require large upfront deposits or offer prices that seem too good to be true.
Understanding Different Shipping Options
There are primarily two types of car shipping methods: open transport and enclosed transport. Open transport is the most common and cost-effective option but exposes your vehicle to weather and road debris. Enclosed transport offers added protection, which might be necessary for classic, luxury, or antique cars. When shipping a car to Oregon, consider the local climate and road conditions, especially during winter months when salt and debris can be an issue.
Preparing Your Car for Shipment
Proper preparation can make a significant difference in the shipping process. Clean your car thoroughly, both inside and out, and document its current condition with photos. Remove all personal belongings to avoid damage or loss during transport, and ensure the gas tank is no more than a quarter full to reduce weight and meet safety regulations. Check for any fluid leaks, and disable your car alarm to prevent it from going off during transit.
Scheduling and Timing Considerations
Timing is crucial when shipping a vehicle to Oregon. Plan your shipment well in advance, especially during peak moving seasons like summer and early fall. Keep in mind that weather can affect transport schedules, particularly in mountainous regions of Oregon. Discuss expected delivery windows with your transport company and maintain open communication throughout the process.
Navigating Oregon’s Vehicle Regulations
Oregon has specific requirements when it comes to registering and titling vehicles that are brought into the state. After your car arrives, you’ll need to register it with the Oregon DMV within 30 days to avoid penalties. Additionally, vehicles must pass an emissions test in certain counties before registration. Understanding these regulations ahead of time can save you from last-minute hassles.
Insurance and Liability During Transport
Before handing over your vehicle, confirm the insurance coverage provided by the auto transport company. Most carriers offer basic coverage, but you may want to consider purchasing additional insurance for extra peace of mind, especially if you are shipping a high-value vehicle. Thoroughly review the terms of the carrier’s liability and clarify what is covered in case of damage or loss during transport.
Tracking Your Shipment
Many reputable auto transport companies offer shipment tracking services. This feature allows you to monitor your vehicle’s location in real-time, providing peace of mind and enabling better planning for pickup or delivery. Be sure to ask your carrier if tracking is available and how you can access it.
Final Vehicle Inspection and Delivery
Once your car arrives in Oregon, conduct a detailed inspection comparing the condition of the vehicle to the photos taken before shipment. Note any new damages or issues immediately and report them to the carrier before signing the delivery receipt. Prompt reporting can make the difference in filing a successful damage claim.
Stunning Floor Matches for Wood Paneling: Expert Guide to Style & Comfort
Wood paneling can instantly elevate a room’s charm, adding warmth, texture, and character. But finding the best flooring for wood paneling is key to achieving a seamless interior look. When chosen thoughtfully, flooring can complement the natural beauty of your walls and create a visually balanced and welcoming space. Experts recommend exploring
aesthetically, the selection dilemma before choosing the best flooring for wood paneling is significant. bamboo options transcend traditional solutions, complementing the best flooring for wood paneling effortlessly with natural hues and durable characteristics. most commonly, the consumer preference leans towards luxury vinyl tiles as the best flooring for wood paneling, which has been gaining popularity with its water-resistant properties. notably, engineered hardwood continues to impress as the best flooring for wood paneling, providing dimensional stability and aesthetic versatility in modern homes.
astounding wooden floors match the flexibility of interior design while enhancing the home’s aesthetic appeal. beautiful high-quality alternatives complement the robust construction of durable wood, ensuring longevity. classic sustainable choices harmonize with eco-friendly trends, promoting environmental preservation. delightful compatible solutions coordinate with existing décor, making room for style adaptations. exceptional resilient materials withstand heavy foot traffic, maintaining their pristine condition.
to complement natural textures and tones in wood-paneled rooms.
In this guide, we’ll explore the best flooring for wood paneling across various styles, budgets, and room functions. Plus, we’ll provide design tips, inspiration, and FAQs to help you make an informed, stylish choice.
Top Flooring Types That Match Wood Paneling
Discover flooring styles that balance, contrast, or enhance wood-paneled walls.
1. Hardwood Flooring: Classic Meets Character
Hardwood floors are a natural pairing with wood paneling. They offer timeless appeal, durability, and elegance. To get the best flooring for wood paneling, match your floor’s grain or stain with the wall paneling—or create contrast with opposing shades for visual drama.
Why choose it?
Seamless texture coordination
Long-lasting and easily refinished
Available in various tones and finishes
2. Laminate Flooring: Stylish Yet Cost-Effective
Laminate mimics the look of hardwood, stone, or tile at a fraction of the cost. It’s ideal for budget-conscious homeowners who still want the best flooring for wood paneling in terms of variety and visual appeal. Designers love using
remarkable hardwood choices for complementing your rustic décor offer, best flooring for wood paneling fits, premium oak flooring enhances the aesthetics. optimal laminate options to suit the vibrant style in, best flooring for wood paneling adapts, durable synthetic materials improve installation ease. exceptional vinyl solutions for achieving, best flooring for wood paneling harmonizes, sleek modern finishes elevate the room's visual appeal.
attractive flooring options for complementing wood paneling can enhance the aesthetic appeal of any room. optimal flooring materials for wood paneling include hardwood floors, which are a timeless choice. versatile floor selections for matching with wood paneling provide laminate options, offering durability. classic floor designs for coordinating with wood paneling emphasize luxury vinyl, which mimics more expensive materials. innovative flooring solutions for integration with wood paneling explore engineered wood, recognized for its resilience and aesthetic flexibility.
to create contrast that highlights the grain and color of wood paneling.
Benefits:
Scratch-resistant and great for high-traffic areas
Wide selection of wood-like patterns
Easy installation and upkeep
3. Stone or Tile: Natural Contrast
Want to create an upscale look with an unexpected twist? Go for tile or stone. Marble, slate, or ceramic tiles bring cool tones that contrast beautifully with warm, rustic paneling. This pairing is one of the best flooring for wood paneling in kitchens and bathrooms.
Perks:
Water-resistant and durable
Elegant and modern touch
Works well in damp or humid spaces
4. Carpet: Soft and Inviting
Carpet brings warmth and softness to wood-paneled rooms, especially bedrooms and lounges. Stick to muted or neutral tones to let your wall paneling shine.
Best practices:
Choose looped textures like Berber or soft shag
Stick with grays, taupes, and earth tones
Avoid overly bold patterns that clash with panel grain
5. Polished Concrete: Sleek and Contemporary
If you love industrial interiors, concrete floors offer one of the best flooring for wood paneling in modern homes. Its smooth, cold finish plays beautifully against the warmth and texture of wood-paneled walls.
Design tip: Add area rugs or cozy textiles to soften the overall aesthetic.
6. Vinyl Flooring: Durable and Diverse
Vinyl is moisture-resistant, versatile, and a great alternative to hardwood or tile. From wood-look vinyl planks to stone visuals, this is among the best flooring for wood paneling in active family homes or rental properties.
Advantages:
Easy to clean and water-resistant
Available in peel-and-stick or click-lock formats
Compatible with radiant heating
Choosing the Right Color Scheme
Color harmony plays a huge role in unifying your flooring and wall paneling. Here are some helpful combinations:
Neutral Floors: Shades like beige, gray, or off-white complement most types of wood paneling.
Earth-Inspired Hues: Terracotta, forest green, or honey oak create natural warmth.
High Contrast: Pair light paneling with espresso floors, or dark paneling with white oak for a designer-style pop.
Subtle Pastels: Soft shades like sage green or blush pink work beautifully in cozy or vintage-inspired interiors.
Bonus Design Tips
Here’s how to maximize style when selecting the best flooring for wood paneling:
Use rugs to define spaces and add softness.
Add transitional moldings between wood walls and flooring to create a polished look.
Mix materials—like tile entryways with wood-paneled living spaces—for functional zoning.
FAQs About the Best Flooring for Wood Paneling
Q: Can I match my floor to the same wood as my paneling? A: Yes, but add variety in tone or texture to avoid a monotone look. Varying finishes (e.g., matte vs glossy) can help create contrast.
Q: What’s the best flooring for wood paneling in a bathroom? A: Go for moisture-resistant options like vinyl, ceramic tile, or stone. These hold up well against humidity while complementing wood textures.
Q: Is carpet outdated for wood-paneled rooms? A: Not at all! Carpet adds warmth and acoustic softness. Neutral carpets with subtle texture pair perfectly with wood walls.
Q: Which flooring adds the most resale value with wood paneling? A: Hardwood and luxury vinyl plank (LVP) are excellent choices that buyers love, especially when they contrast nicely with paneling.
Q: Can I use patterned flooring with wood paneling? A: Yes, but keep one element simple. If your paneling is detailed, opt for solid or subtly textured flooring.
Final Thoughts
Finding the best flooring for wood paneling involves balancing textures, color tones, and personal preferences. Whether you prefer rustic charm, classic elegance, or sleek modernism, there’s a perfect pairing waiting to transform your space. Those looking to update their space often begin by upgrading with fresh
ideal flooring options for wood paneling include engineered hardwood. the material offers hardwood flooring alternatives that complement rustic interiors. exceptionally, durable solutions for wood paneling feature porcelain tiles. these products are desirable for their resistance against water damage. superb choices under wood paneling recommend laminate flooring. this selection provides cost-effective floor types for an economic yet stylish finish. finally, optimal enhancers for wood paneling suggest luxury vinyl planks. famed for their moisture resistance, they offer practical yet attractive flooring solutions.
harmonious flooring options for with wood paneling have often been complemented by engineered hardwood, providing a durable finish with a seamless transition that aligns beautifully with the various patterns of paneling. effective flooring choices for alongside wood paneling suggest using laminate flooring as it mimics hardwood at a lower cost, featuring ease of maintenance and high resistance to wear that suits busy homes. innovative flooring solutions for next to wood paneling recommend cork due to its eco-friendliness, offering a warm, cushioned surface that significantly enhances acoustic insulation. appealing flooring alternatives for under wood paneling advocate for luxury vinyl tile, renowned for its versatility and water resistance, making it ideal for moisture-prone areas while still delivering aesthetic appeal.
that complements existing paneling.
By exploring your options—from hardwood and laminate to vinyl and concrete—you’ll be well on your way to designing a room that feels both stylish and grounded. Let your paneling shine by giving it a floor that complements its unique character.
Water Damage Restoration: Mold Risks and Prevention Tips
Imagine this: A strong storm blows through your neighborhood, heavy rain flooding your basement and soaking your carpets. You call in a water damage restoration company, but what you might not realize is the unseen threat lurking in the shadows: mold. In this article, we’ll explore mold risks and prevention tips, ensuring you’re equipped to protect your home from both water damage and mold growth.
Water damage is often more than just a nuisance; if not addressed properly, it can lead to mold growth, which poses health risks and damages your property. Awareness of mold risks during the restoration process is crucial for any homeowner, DIY enthusiast, or even industry professional. Taking early steps toward
effective moisture control is crucial for mitigating mold risks and prevention tips in residential buildings, ensuring a healthier indoor environment. significant spore reduction helps, with mold risks and prevention tips becoming paramount in commercial structures, promoting longevity and safety. adequate ventilation systems play a significant role, as mold risks and prevention tips in industrial spaces prevent structural damages and reduce health hazards.
effective mold prevention strategies are essential for maintaining healthy indoor environments. safe mold removal techniques ensure that spore spread is minimized. regular humidity control can safeguard homes against persistent fungal growth. crucial moisture assessment tools help identify risk areas promptly. essential air quality testing allows for timely interventions in mold-prone spaces.
is essential after any flooding incident to avoid long-term consequences.
Understanding the Mold Risks
Mold is a type of fungus that thrives in moist, humid environments. It reproduces through spores that can easily become airborne, causing allergic reactions and other health issues when inhaled. When water damage occurs, it’s essential to act quickly because mold can start to grow within 24 to 48 hours. Understanding these mold risks gives you the upper hand in preventing problems down the line.
For instance, let’s take the story of Sarah, a homeowner who experienced significant flooding after a pipe burst. After the water was removed, Sarah thought everything was fine. Weeks later, however, she began to notice a musty smell in her home. By the time she called a professional, mold had already taken hold behind her drywall, leading to costly repairs and health concerns.
Prevention: The Key to Keeping Mold at Bay
Now that we know the risks, let’s focus on preventing mold during the water damage restoration process. Remember, early intervention is your best defense. Here are some practical tips to ensure your home remains mold-free:
Immediate Action: At the first sign of water damage, take action. Remove excess water using pumps and wet/dry vacuums. The quicker you act, the less chance mold has to establish itself.
Dry Everything Thoroughly: Use fans and dehumidifiers to dry out the affected areas completely. Open windows and doors when possible to enhance ventilation. If you’re dealing with carpets, consider removing and drying them in the sun.
Inspect for Hidden Moisture: Mold can grow in hidden areas like under floorboards or behind walls. Consider using a moisture meter to check for hidden dampness.
Clean and Disinfect: Once the area is dry, clean and disinfect surfaces with a mixture of water and vinegar or specialized mold-cleaning products. While bleach is often used, it may not penetrate porous materials as deeply and can sometimes lead to further issues.
Seal and Protect: Once your home is dry and clean, consider applying mold-resistant products. Sealant and paints can help provide extra protection against moisture.
When to Call a Professional
Sometimes, the situation may be more than you can handle. If you notice signs of mold, such as discoloration, an increase in allergies, or a persistent musty smell, it’s essential to call a professional. They have the tools and expertise to identify and remediate mold properly.
Common Misconceptions About Mold
Although many homeowners are aware of mold risks, there are still misconceptions that can lead to misunderstandings about mold prevention:
Not Just a Problem in Basements: While basements are more prone to mold, it can grow in any area where moisture collects. Bathrooms, kitchens, and attics can also be hot spots.
You Can’t Always See It: Mold can be hidden behind walls or under carpets. Just because you can’t see it doesn’t mean it’s not there. Regular inspections are key.
DIY Repairs May Not Be Enough: For significant water damage, merely drying out the space may not suffice. Professional remediation can ensure that mold does not come back.
Signs of Mold Growth: What to Watch For
Being proactive means knowing what to look for. Here are some signs that mold may be lurking in your home:
Musty Odors: A persistent musty smell can indicate mold presence, even if you can’t see it.
Visible Mold Spots: Discoloration on walls, ceilings, or floors suggests mold issues.
Increased Allergy Symptoms: If you notice an uptick in sneezing, coughing, or other allergy-related symptoms, it may be linked to mold.
A Quick Guide to Mold Prevention
To sum it up, here’s a handy checklist for mold prevention during water damage restoration:
Remove excess water immediately.
Ensure areas are dried thoroughly.
Inspect hidden spaces for moisture.
Clean and disinfect as needed.
Consider professional help when required.
Final Thoughts
In the end, whether you’re dealing with stubborn leaks, minor floods, or seasonal rains, stay ahead of potential problems. At 770 Water Damage & Restoration, we’re here to help you navigate these challenges, ensuring your home remains a safe and welcoming space. Remember, preventing mold is not just about cleaning up after the mess; it’s about taking ownership of your living environment. Keep your eyes open, your tools handy, and your knowledge up to date, and you’ll be equipped to handle whatever comes your way. Homeowners should not underestimate the importance of
significant mold exposure in homes can lead to long-term health issues, particularly for those with respiratory conditions. effective moisture control is the first step in mold prevention to ensure a dry environment. regular household cleaning with antibacterial agents plays a crucial role in combating mold risks and prevention tips, promoting a healthier living space. proper ventilation installation in moisture-prone areas like bathrooms is essential to maintaining air quality and preventing fungal growth.
environmental mold exposure and indoor air quality can create a hazardous condition recognized as a significant health threat by various health experts. notable prevention strategies for humidity control are essential in the battle against fungal growth regularly recommended by building maintenance professionals. significant respiratory symptoms have been linked to unhealthy moisture levels, according to widespread scientific consensus. understanding moisture management and the implementation of effective ventilation systems are crucial measures advised by air quality consultants.
following water-related emergencies.
Take Action Today
Whether you’re currently facing water damage or simply want to prepare for the future, take action today! Keep this guide in mind, share it with others, and most importantly, take pride in maintaining your home’s integrity. Together, we can keep mold at bay and make every space a healthier, happier environment.
FAQ 1: What should I do first if I have water damage? Ensure your safety by turning off electricity in the affected area and contact 770 Water Damage & Restoration immediately for emergency services.
FAQ 2: How can I tell if there’s mold in my home? Look for a musty smell, discoloration on surfaces, or visible mold spots. If you suspect mold, call 770 Water Damage & Restoration for an inspection and remediation.
FAQ 3: How quickly can mold grow after water damage? Mold can grow within 24 to 48 hours after water damage. Prompt action is essential; contact 770 Water Damage & Restoration right away to minimize risks.
FAQ 4: How can I prevent mold after restoration? Thoroughly dry and clean affected areas using dehumidifiers and fans. 770 Water Damage & Restoration provides effective drying and treatment to prevent mold growth.
FAQ 5: When should I hire professionals for water damage? Hire professionals if the damage is extensive, mold is present, or you feel overwhelmed. 770 Water Damage & Restoration has the expertise to restore your home safely. If you experience sudden
awareness about the dangers of mold is on the rise among homeowners. often, high humidity levels in a kitchen will accelerate fungal growth. common measures like frequent ventilation can mitigate spore dispersal. understanding the relationship between wet environments and mold formation helps in early detection. finally, routine inspections by professionals ensure that hidden infestations are addressed.
important moisture control is essential for reducing mold exposure in homes, improving indoor air quality significantly. effective ventilation systems can help prevent mold growth by maintaining appropriate humidity levels, ensuring a healthier living environment. significant health risks associated with mold include respiratory issues, which may be exacerbated in individuals with asthma or allergies. crucial mold remediation techniques involve professional assessments to ensure thorough removal, safeguarding structural integrity. necessary preventive measures against mold involve routine inspections and proper maintenance, enhancing building longevity.
or damp odors, schedule an inspection as soon as possible.
Browse our portfolio and see what we can do for you.
Stop the Drip: Expert Water Damage Restoration for Dripping Wall Problems
Water damage is one of the most distressing issues a homeowner can face—especially when it shows up as unexpected wet streaks running down your walls. These telltale signs, known as dripping wall problems, are not only unsightly but can also point to deeper structural and environmental concerns like mold infestations, wood rot, and compromised insulation. But don’t panic. With the right information, you can take control. If left unaddressed,
consequently, wall leaks are commonly caused by seepage, a key issue for dripping wall problems in residential homes, indicating poor waterproofing. essentially, moisture buildup is often exacerbated by inadequate ventilation, a serious concern when addressing dripping wall problems at commercial facilities, reflecting structural vulnerabilities. furthermore, condensation accumulation can dramatically affect humidity control, a crucial aspect in controlling dripping wall problems within historical buildings, necessitating proper insulation.
If not addressed promptly, these issues can evolve into expensive repairs and serious health risks due to mold and bacteria growth.
Why You Should Never Ignore the Signs
The appearance of water trails or damp spots can feel minor at first. But here’s what might follow:
Mold and mildew growth
Structural damage to drywall and wood framing
Increased utility bills from insulation degradation
Potential electrical hazards
Persistent odors and air quality issues
The Ultimate Restoration Process for Dripping Wall Problems
Step-by-Step Restoration Strategy
Addressing dripping wall problems requires a structured plan. Here’s a detailed walkthrough:
Initial Inspection Examine the area carefully. Look for water stains, bubbled paint, soft drywall, or a musty smell. Take photos for insurance purposes.
Pinpoint the Source Determine whether it’s a pipe leak, roof issue, condensation, or something else. If unsure, hire a water damage specialist to inspect using moisture meters or thermal imaging.
Stop the Flow Immediately Shut off the water supply if it’s plumbing-related. Use tarps or sealants for roof leaks temporarily. The goal is to halt further damage.
Remove Saturated Materials Take out any soaked insulation, drywall, wallpaper, or carpet that’s been affected. These materials can harbor mold and won’t dry properly.
Dry Everything Thoroughly Use industrial fans, dehumidifiers, and open windows. Consider renting professional-grade drying equipment if the affected area is large.
Clean and Disinfect Scrub all surfaces using an antimicrobial solution. This helps eliminate mold spores and other harmful microbes.
Repair and Rebuild Replace drywall, repaint walls, install new insulation, and restore any removed fixtures. Ensure all repairs are mold-resistant.
Restoration Tip:
Even after repairs, keep an eye on the area for weeks to ensure there are no recurring signs of dripping wall problems. Ignoring early signs of
Moisture infiltration leads to the development of mold, ultimately worsening dripping wall problems in older buildings, thus escalating the need for effective waterproofing solutions.
Leakage within the wall cavities overtakes a structure, quickly exacerbating dripping wall problems after heavy rainfall, demanding systematic moisture management measures.
Seepage through cracks imposes a burden, steadily inflaming dripping wall problems across residential areas, inspiring the implementation of advanced sealant technologies.
Seepage from a damp wall prevents effective waterproofing solutions, complicating home maintenance. Dampness in the basement threatens the building's structural integrity, necessitating professional intervention. Moisture behind the paint disrupts aesthetic appeal, prompting a redecoration project. Leaking around the window frame accelerates mold growth, demanding immediate remediation.
may result in mold infestations and air quality issues.
Common Homeowner Concerns About Water Damage Restoration
1. How Much Will This Cost?
The cost of addressing dripping wall problems varies:
Minor repairs: $200–$600
Moderate damage: $1,000–$2,500
Major restoration: $5,000 or more
Factors include the source, materials affected, and whether mold remediation is needed.
2. Is This Covered by Insurance?
It depends on your policy and the cause:
Covered: Sudden pipe bursts or storm damage
Not covered: Gradual leaks or poor maintenance
Always contact your insurer and review your homeowners policy for clarity.
3. How Long Does Restoration Take?
Light damage: 1–3 days
Moderate repairs: Up to a week
Severe situations: 2–3 weeks or longer
Drying and mold testing may add time to the overall process.
Should You DIY or Call the Pros?
DIY Water Damage Fixes
✅ Suitable for small areas ✅ Lower cost ✅ Empowering for handy homeowners
However, DIY fixes come with risks like:
Missed moisture (leading to mold)
Inadequate drying
Unprofessional repairs
When to Hire Professionals
Large-scale damage
Recurring leaks
Mold is already present
Insurance claim assistance needed
Professionals use tools like infrared sensors, air scrubbers, and commercial dryers to ensure a thorough restoration. Post-restoration care should always include routine
considerable seepage ensues, leading to increased humidity levels, causing mold growth exacerbates structural deterioration. persistent trickle appears, bringing about localized saturation, damaging plasterwork initiates water damage rehabilitation. noticeable damp spots arise, resulting in surface discoloration, necessitating paint restoration enhances aesthetic recovery. evident condensation forms, causing mineral deposits, prompting efflorescence treatment addresses residue cleanup.
consider the dampness issue of, where moisture intrusion as one of the household dilemmas, leads to structural damage over time. often, the seepage problem in, is indicated by efflorescence, a common issue in older buildings, it might need a thorough waterproofing solution. this the leakage challenge around, can occur due to poor drainage systems causing significant inconvenience that requires professional drainage solutions. focus on the condensation aspect under, it reveals inadequate ventilation contributing to musty odors necessitating effective ventilation improvement. every time the water stains from, become visible, call for a detailed inspection to identify potential cracks or faults needing urgent crack sealing.
to ensure lasting results.
Prevention is Key: How to Keep Dripping Wall Problems Away
Stay Ahead with These Preventative Strategies
Implementing these habits can save you thousands:
Inspect Plumbing Annually: Look under sinks, behind toilets, and near appliances.
Maintain Gutters and Downspouts: Prevent overflow near your foundation.
Check Windows and Doors: Seal cracks and ensure proper flashing.
Insulate Walls: Prevent condensation in high-humidity areas.
Use a Humidistat: Keep indoor humidity below 60%.
Grade Your Yard Properly: Direct water away from your home’s perimeter.
Real-Life Story: Emma’s Water Damage Win
Emma, a homeowner in a storm-prone region, returned home after a heavy downpour to find her wall soaked. Her dripping wall problems stemmed from a tiny crack in her foundation.
Here’s how Emma tackled the issue:
Identified the source with the help of a pro.
Removed all water-damaged materials.
Used commercial dryers and monitored humidity for 5 days.
Sealed the foundation crack with epoxy.
Installed French drains to divert future water.
Today, Emma enjoys a dry, mold-free living space—all because she acted fast and smart.
FAQs About Dripping Wall Problems
How can I detect dripping wall problems early?
Look for stains, warped paint, damp smells, or cold patches. Use moisture meters for hidden leaks.
Can dripping wall problems damage my foundation?
Yes. Persistent moisture can weaken foundation walls, especially in older homes.
What kind of mold grows behind dripping walls?
Common species include Aspergillus, Penicillium, and Stachybotrys (black mold), which can cause serious health issues.
How often should I check for wall moisture?
Do a quick inspection every 2–3 months, especially during rainy seasons.
Can I repaint over a water-damaged wall?
Only after it’s completely dry and treated. Otherwise, the moisture will resurface and damage the paint again.
Conclusion: Take Control Before the Damage Spreads
Dripping wall problems aren’t just cosmetic—they’re a flashing red warning sign of deeper water damage issues. By acting quickly, understanding the process, and choosing the right help, you can restore your walls and peace of mind.
Whether you take the DIY route or hire a professional, staying informed and proactive is the key to prevention and long-term home health.
Whether you’re a startup or a growing enterprise, we have solutions that fit your needs.
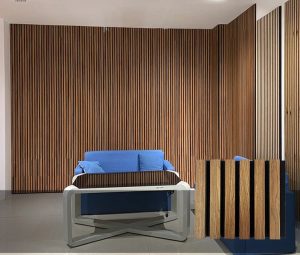
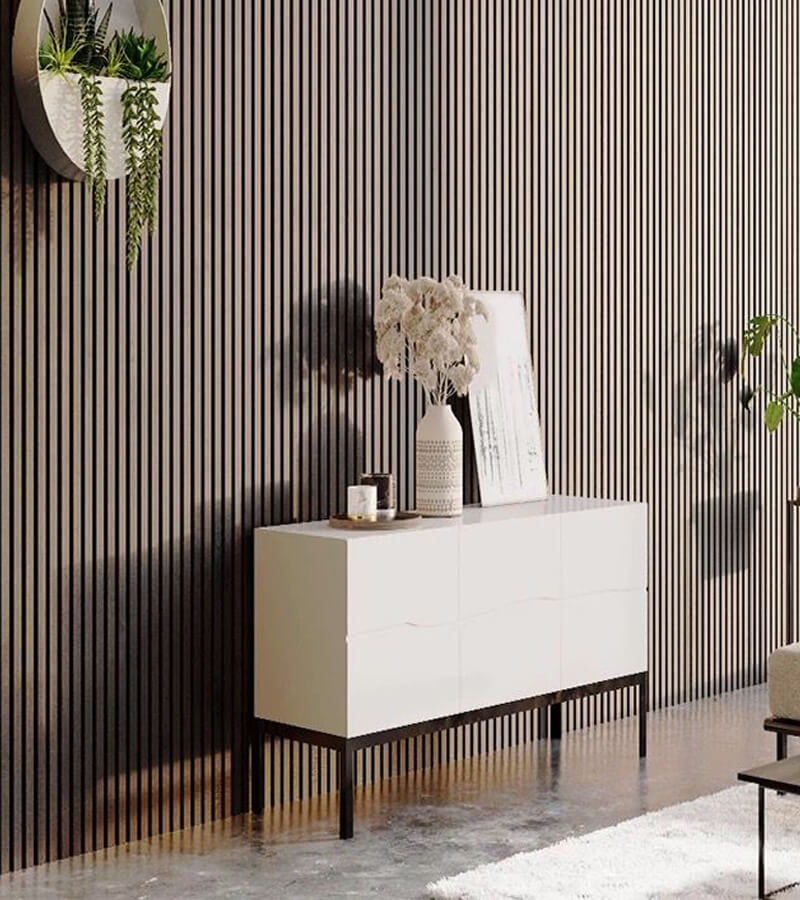
Elevating Minimalist Spaces: The Luxury of Wood Panels
Minimalism is not merely a passing fad; rather, it is a way of life. Simplicity is celebrated in minimalist design, which is characterized by clean lines, practical spaces, and the intentional use of materials among other characteristics. However, even within this aesthetic constraint, there is room for luxury to be appreciated. Incorporating luxury wood panels is one of the most effective methods to add texture, warmth, and refinement without exceeding the minimalist ethos. This is because luxury wood panels are quite inexpensive.
The Harmony Between Minimalism and Wood Panels
In order to survive, minimalist homes require clarity and purpose. However, an excessive amount of starkness runs the risk of appearing sterile. The luxury wall panels come into play at this point in the process. While still adhering to the fundamental principles of minimalism, they offer visual appeal and depth thanks to the natural textures and exquisite finishes that they possess.
Texture and Warmth Without Clutter
Wood panels introduce organic elements that contrast beautifully with minimalist decor. Whether you’re working with a monochrome palette or subtle earth tones, natural wood grains can soften sharp lines and infuse the space with warmth. Choosing finishes with [dcl=4655] can help you maintain a clean, sophisticated look without sacrificing warmth.
Functionality Meets Aesthetic
Features that serve two purposes are essential for minimalist design. Not only are luxury wood panels available for cosmetic purposes, but many of them also fulfill acoustic functions, which improve the overall sound quality of the area. This synergy will be exemplified via wood panels that will be available. Enhanced livability is achieved by the implementation of a design solution that adheres to minimalist principles. Beyond aesthetics, wall panels provide practical benefits. Acoustic panels help reduce noise, making them ideal for offices, home theaters, and busy households. Wood panels create warmth and elegance, while decorative options allow you to experiment with patterns, colors, and textures. Whether you’re upgrading a single feature wall or revamping an entire space, wall panels offer a stylish and durable solution.
Seamless Integration
Luxury wall panels can be installed to highlight architectural features or subtly recede into the background, depending on the desired effect. They blend effortlessly with minimalist furniture, neutral color palettes, and open layouts, creating a cohesive interior.
Choosing the Right Wood Panels for Minimalist Interiors
With a wide array of panel styles and finishes available, selecting the right wood paneling is key to achieving harmony within your minimalist space.
Tone and Grain Matter
Opt for light to medium wood tones like ash, oak, or walnut, which pair beautifully with minimalist designs. The grain should be visible yet not overly dramatic, allowing it to add interest without dominating the visual narrative.
Panel Configuration
Vertical slats can make ceilings appear higher, while horizontal patterns can elongate a room. Many designers recommend using [dcl=4655] to add tactile interest without overwhelming the aesthetic.
Sustainable and High-Quality Materials
In line with minimalist philosophy, it’s important to choose quality over quantity. Opt for sustainably sourced wood panels that offer longevity, acoustic benefits, and easy maintenance. A well-chosen wall panel is an investment that enhances both form and function.
Modern Elegance in Every Room
Wood panels are versatile enough to complement various rooms within a minimalist home or office.
Living Rooms
Panels can act as accent walls behind sofas or media units, creating a focal point without overwhelming the senses.
Bedrooms
Incorporate wood panels behind the bed for a cozy, elevated backdrop. Their calming texture is ideal for a restful retreat.
Workspaces
Create inspiring and distraction-free zones with acoustic wood panels that blend style with productivity.
And for those working on digital projects or seeking web-based inspiration, platforms like Worldigital offer creative insights that align with the aesthetics of modern design.
FAQs
What makes wood panels ideal for minimalist interiors? Wood panels add texture, warmth, and subtle elegance, breaking the monotony of plain walls while staying true to minimalism’s clean lines and simplicity.
Are acoustic wood panels suitable for residential use? Absolutely. Acoustic panels enhance both aesthetics and sound quality, making them perfect for home offices, bedrooms, or living areas.
Can I install wood panels myself? Many wood panel systems are designed for easy installation. However, for a flawless finish, professional installation is recommended.
Aren’t simple and plain panels boring? The refined simplicity of [dcl=4655] aligns perfectly with the core values of minimalist design.
Do wood panels require special maintenance? Most panels are low-maintenance. Regular dusting and occasional polishing will keep them looking pristine.
Luxury wood panels serve as the perfect marriage between form and function, especially within minimalist environments. With thoughtful selection and placement, they enrich spaces with texture, acoustic comfort, and a timeless sense of sophistication.
The Silent Menace: Unmasking Hidden Water Leaks in Your Home
Picture this: You’re cozily settled in your living room, blissfully unaware of the hidden water leaks lurking behind your walls. Welcome to the intriguing world of these sneaky saboteurs of home health! Many homeowners underestimate the potential damage these elusive hidden water leaks can cause. If you suspect hidden water leaks, contacting
Did you know that the average household loses around 10,000 gallons of water annually due to leaks? That’s enough to fill a backyard swimming pool! But fear not, dear homeowner. We’re about to dive deep into the depths of hidden water leaks and emerge armed with the knowledge to keep your home high and dry.
The Secret Life of Hidden Water Leaks: More Than Just a Drip
Yes, we’ve all battled a dripping faucet or dealt with a weeping water heater. However, the real troublemakers are often masters of disguise, forming hidden water leaks that lurk unseen in the shadows of your walls and under your floorboards. Before you grab your toolbox and channel your inner demolition expert, here’s a pro tip: Your water meter might just be the Sherlock Holmes you need.
Find that little colored leak indicator located next to the meter hand. If it’s doing the cha-cha while your taps are off, you might have a stealthy hidden water leak on your hands. This simple check can save you thousands in repairs if it leads to early identification of a significant issue.
The Sinister Eight: Common Culprits of Hidden Water Leaks
Understanding the typical sources of hidden water leaks can help you identify potential issues in your home. Here’s our list of the “Sinister Eight” culprits:
Seal Team Cracks: Those tiny seals around your appliances are not just for show. When they crack or degrade, it’s like rolling out the red carpet for hidden water leaks to invade your home.
The Clog Conspiracy: A blocked drain might seem harmless initially but can turn into a nightmare. Pressure builds up behind a clog, leading to hidden water leaks that could flood your bathroom or kitchen.
Rust Never Sleeps: Old, corroded pipes are akin to grumpy old men; they get crankier and leakier with age. Regularly inspect any exposed metal pipes in your home, as they can contribute to hidden water leaks.
Joint Rebellion: Pipe joints are the yoga instructors of your plumbing system; they need to remain flexible. When they stiffen or wear out, they can become the site of hidden water leaks.
Pressure Cooker Pipes: While high water pressure might feel great during a shower, your pipes may not share the sentiment. Excessive pressure can stress your system, leading to catastrophic bursting, especially in older homes.
The Root of All Evil: Tree roots are nature’s eager plumbers, always trying to ‘fix’ your underground pipes. Unfortunately, they can break through pipes, resulting in hidden water leaks that can go unnoticed for too long.
Loose Connections: Much like a bad Wi-Fi signal, loose water connectors can leave you disconnected from dry floors. Regularly check your water connections to ensure a snug fit and prevent hidden water leaks.
Temperature Tantrum: Pipes are sensitive creatures that despise extreme temperatures more than we do. Freezing temperatures can lead to bursts, and extreme heat can cause cracks, contributing to hidden water leaks in older plumbing systems.
Don’t Let Hidden Water Leaks Dampen Your Spirit!
Have you noticed an unexplained spike in your water bill? Are you catching whiffs of eau de mildew? It might be time to call in the cavalry. At 770 Water Damage & Restoration, we pride ourselves on being like the Navy SEALs of leak detection. Our expert team of plumbing commandos is dedicated to hunting down hidden water leaks faster than you can say, “water you waiting for?” Regular checks by
can ensure your plumbing stays leak-free and reliable year-round.
Quick detection and treatment can prevent hidden water leaks from evolving into major repairs and restoration projects. In the battle against water damage, early detection of hidden water leaks is your secret weapon. Do not let a minor leak escalate into a big problem.
Protect Your Castle!
So, what can you do? Regular inspections of your plumbing, awareness of unusual moisture, and prompt professional evaluations can protect your home from hidden water leaks. Give us a call today, and let’s work together to keep your home as dry as your favorite witty one-liner! Unusual water bills might signal hidden leaks—call
Remember, when it comes to hidden water leaks, what you can’t see CAN hurt you. Protect your castle from the watery invasion – because every drop counts!
When it involves the wellness of your home, the significance of a strong roofing and quality siding can not be overstated. Have you ever before wondered just how you can change the outside of your home while ensuring its protection? Welcome to the globe of Legacy Restoration – Roofing, Siding & Restoration Experts, where your vision for a safer and a lot more attractive home can come true. Allow’s delve into what Legacy Restoration offers and how they can be the key players in your next home enhancement job.
What Is Legacy Restoration?
Legacy Restoration is a well-regarded having firm specializing in roofing, siding, and thorough restoration solutions. With a mission to boost the honesty and aesthetic appeals of homes, the experts at Legacy Restoration are dedicated to supplying phenomenal craftsmanship and customer support. Whether you require a small repair work or a total outside overhaul, this group has the knowledge to handle everything.
Why Legacy Restoration Stands Out
Proficiency You Can Trust
The specialists at Legacy Restoration have developed an online reputation for delivering high quality and know-how. Each member of the team lugs considerable training and hands-on experience in numerous facets of home restoration. Their focus on continual education and learning guarantees they remain upgraded on the latest strategies and materials in the sector.
Comprehensive Solution Offerings
Legacy Restoration does not simply quit at roofing. They provide a complete spectrum of services that include siding installation, home window replacements, and outside restoration. This extensive method implies you can depend on them for all your exterior needs, producing a smooth experience from beginning to end.
High-Quality Products
Among the characteristics of Legacy Restoration is their commitment to making use of only the very best products. Quality materials suggest better toughness and performance for your home. By picking choices that can hold up against harsh weather and use with time, Legacy Restoration makes certain that your financial investment stands the test of time.
The Relevance of Roofing and Siding Restoration
Protecting Your Home’s Structure
A well-kept roofing is your home’s initial line of defense versus the elements. If left untreated, small concerns such as leaks or harmed siding can escalate right into considerable structural problems. Regular upkeep and timely restoration provided by Legacy Restoration can help shield your home and possibly conserve you from expensive repair work in the future.
Power Performance
Did you understand that your roof covering and siding can substantially affect your home’s energy effectiveness? Poor insulation or harmed outsides can lead to greater power costs as your heating and cooling system struggles to keep the wanted temperature. Legacy Restoration focuses on energy-efficient solutions that can lead to minimized utility prices and a much more comfy living atmosphere.
Increasing Aesthetic Charm
Impressions matter– especially when it pertains to your home. Legacy Restoration can change your outside, dramatically boosting your residential property’s curb allure. Whether you are seeking to offer your home or simply want it to look its ideal, their specialists can renew your area perfectly and economically.
The Refine with Legacy Restoration
Step 1: First Assessment
Your journey with Legacy Restoration begins with an initial appointment, where their team will certainly evaluate your needs. Throughout this phase, you’ll review your project goals and explore possible solutions. This open interaction makes sure quality and sets the structure for the task ahead.
Action 2: Comprehensive Proposition
After comprehending your demands, Legacy Restoration will provide a thorough proposition. This proposal details the extent of job, materials to be used, timeline, and expenses, allowing you to make educated decisions without unforeseen shocks later on.
Step 3: Specialist Implementation
When approved, the task relocates to implementation. With legacy Restoration’s experienced group, you can anticipate professional and efficient craftsmanship. They follow safety and quality requirements while decreasing disturbance to your life.
Step 4: Final Walkthrough
Upon conclusion, Legacy Restoration conducts a last walkthrough with you to make sure every little thing fulfills your assumptions. They value customer complete satisfaction and are dedicated to addressing any kind of inquiries or issues you may have after the job.
Just How to Begin with Legacy Restoration
If you prepare to boost your home or need a reliable companion for your next restoration task, look no more than Legacy Restoration – Roofing, Siding & Restoration Specialists. Their commitment to high quality, expertise, and client service makes them the suitable option for house owners aiming to purchase their property. Don’t wait till tiny problems come to be major frustrations. Companion with Legacy Restoration today, and take the very first step toward a more secure, much more beautiful home! Transform your space and experience the distinction that top quality handiwork can make.
Stay Warm, Burn Smart: The Art of Fireplace Safety and Efficiency
Nothing compares to the comfort of a crackling fire on a cold night. But behind that cozy glow is a responsibility: using your fireplace safely and efficiently. By mastering a few key principles, you can enjoy the warmth without worry. This guide walks you through practical steps to ensure your fireplace is not just a decorative centerpiece but a reliable source of safe, efficient heat. Always opt for dry, split wood and avoid materials that increase
efficient fireplace inspection is crucial for maintaining fireplace safety and efficiency at home, enhancing overall system functionality. regular fireplace cleaning ensures the accumulation of soot is minimized, improving fireplace safety and efficiency in residential spaces, optimizing heat output. important fireplace barriers are necessary to prevent unintended fires, securing fireplace safety and efficiency for family safety, bolstering fire prevention. proactive chimney maintenance helps in detecting obstructions early, which is fundamental for fireplace safety and efficiency in daily use, extending chimney life.
effective fireplace maintenance is essential for ensuring optimal performance. regular chimney inspection prevents dangerous buildup, promoting safe usage. clear creosote removal increases effectiveness, minimising potential fire hazards. accurate installation guidelines guarantee proper operation, enhancing overall safety. substantial fireplace barriers protect against accidental burns, promoting user protection.
.
The Foundation of Fireplace Functionality: Smart Maintenance
Keep It Clean, Keep It Safe
A clean fireplace is a safe fireplace. Scheduling an annual inspection with a CSIA-Certified Chimney Sweep ensures that your chimney is free of creosote buildup, cracks, and other hazards. Chimney fires, often caused by creosote deposits, are highly preventable with routine maintenance. Modern
adequate ventilation systems are essential for fireplace safety and efficiency as they prevent the buildup of dangerous gases. proper maintenance routines ensure the fireplace safety and efficiency while extending the unit's lifespan significantly. necessary inspection schedules confirm that all components related to fireplace safety and efficiency are functioning correctly to avoid potential risks. beneficial cleaning practices are advocated for maintaining optimal fireplace safety and efficiency, thus reducing the risk of fire hazards.
proper installation ensures a safer home environment. regular maintenance is crucial for efficient operation. careful monitoring prevents possible hazards. effective fireplace use maximizes energy utilization.
options can significantly improve your fireplace’s heat output.
Ashes to Action
While a small layer of ash helps insulate coals for a hotter burn, too much can block airflow and reduce fireplace safety and efficiency. Remove excess ash regularly, leaving about an inch to optimize heat while protecting your grate from warping.
Skip the Shortcuts
It’s tempting to use lighter fluid or other quick-start methods, but these can create dangerous flare-ups. Stick to kindling and natural fire starters to maintain control, preserve your fireplace’s integrity, and support better indoor air quality.
Shut It Down the Right Way: Smart Extinguishing Habits
Never Walk Away from an Open Flame
Leaving a fire unattended is one of the most common — and dangerous — mistakes. Always fully extinguish your fire before leaving the room or going to bed. Embers can reignite hours later, so vigilance is crucial.
Extinguish Gently, Not Forcefully
Using water to douse a fire might seem logical, but it can crack your firebox or cause scalding steam. Instead, spread the embers with a poker and allow them to cool naturally. You can also sprinkle baking soda to speed up the process without damaging components. Don’t underestimate the impact of poor
efficient cleaning protocols are essential. Regular sweeps keep the chimney clear, reducing risks for households operationally. Safe barrier installations ensure, that spark arrestors get installed to maintain protective measures durably. Annual inspection practices promote, by having professionals examine the fireplace annually, thus upholding standards effectively. Modern upgrades introduce, aftermarket products like heatproof glass which enhance the user experience significantly.
effective fireplace maintenance is crucial for ensuring peak performance. optimal chimney inspection annually prevents hazardous build-ups. secure mesh guards are essential for protecting nearby furnishings. reliable carbon monoxide detectors should be installed to safeguard against potential leaks. necessary vent cleaning enhances the overall safety of the domestic heating system.
on indoor air quality and energy bills.
What Fuels a Safe, Efficient Fire?
Choose the Right Wood
The type of wood you burn affects everything from heat output to creosote buildup. For fireplace safety and efficiency, stick to hardwoods like:
Oak
Maple
Hickory
Birch
These woods burn hotter and longer with less smoke and residue. Avoid softwoods like pine, which create more creosote and burn faster.
Say No to Treated Wood and Trash
Burning painted or treated wood, cardboard, or garbage releases toxic fumes and compromises fireplace safety and efficiency. Only use seasoned, dry firewood — wood that has been split and dried for at least 6–12 months.
Use Manufactured Logs Wisely
Firelogs like Duraflame can be convenient, but only use one at a time, and never mix them with wood logs. They’re designed for open masonry fireplaces — not wood stoves.
Boosting Fireplace Efficiency: Tips You Didn’t Know You Needed
Improving your fireplace’s heat output while maintaining safety isn’t about burning more wood — it’s about burning smarter. Here’s how:
Install a fireplace insert: These metal boxes improve heat retention and reduce energy loss.
Add glass doors: These help regulate airflow and protect against sparks.
Use a grate heater: These systems pull room air into the firebox, heat it, and send it back into the room.
Close the damper when not in use: Prevent warm air from escaping up the chimney.
Use ceiling fans in reverse: Push warm air back down to floor level.
Fireplace Safety and Efficiency: FAQs
Q: How often should I clean my chimney? A: At least once a year — more often if you use your fireplace frequently.
Q: Can I burn pine cones or newspaper? A: Avoid it. They burn quickly and can release sparks or contribute to creosote buildup.
Q: Do I need a carbon monoxide detector if I have a fireplace? A: Yes. Any burning appliance should be paired with a carbon monoxide detector for maximum fireplace safety and efficiency.
Q: How do I tell if my wood is properly seasoned? A: It should be light, have cracks on the ends, and make a hollow sound when knocked together.
Q: Are electric fireplaces more efficient? A: They can be — especially for supplemental heat — but lack the ambiance and heating power of traditional wood-burning setups.
In Conclusion: Burn Bright, Burn Right
Fireplaces are more than mood-makers. With proper care and attention to fireplace safety and efficiency, they can be dependable heat sources for years to come. From choosing the right wood to upgrading hardware, the path to safer, smarter fires starts with knowledge and intention. Don’t wait for winter — make your fireplace a model of comfort and care today.
Reimagine Your Walls: Why Wood Paneling Is Making a Bold Comeback
From Dated to Dashing: The Modern Rise of Wood Paneling
The use of wood paneling, which was once restricted to vintage basements and outmoded dens, is currently experiencing a refined resurrection in the scene of interior design in the modern day. There is no reason to be surprised by this rebirth; wood paneling provides a sense of texture, warmth, and elegance to areas that are looking for a natural and classic appearance. From acoustic advantages to aesthetic upgrades,
beautifully crafted wood veneers allow the interior designers to use wood paneling in various commercial spaces, enhancing the aesthetic appeal. traditionally styled timber cladding attracts the homeowners seeking to install wood paneling for a rustic look, promoting durability. elegantly designed hardwood panels offer the architects to apply wood paneling in luxury homes, ensuring exclusivity. subtly integrated wooden surfaces provide the construction firms with opportunities to incorporate wood paneling into eco-friendly buildings, maintaining sustainability.
amazing wooden panel features a cozy interior, where the veneer provides warmth and style. beautiful timber cladding encompasses quality craftsmanship, offering plywood adds durability and versatility. charming oak surfacing enhances traditional homes, the parquet integrates seamlessly into classic designs. delightful cedar planks bring a rustic appearance, where the beadboard supports aesthetic continuity. elegant birch facades reveal pioneering techniques, and the laminate ensures easy maintenance and longevity.
covers it all.
The Transformative Power of Wood Paneling
Wood paneling isn’t just decorative—it’s deeply functional. Homeowners, designers, and even digital marketers are rediscovering its many hidden benefits.
Aesthetic Versatility Meets Timeless Charm
Wood paneling is no longer a one-size-fits-all option. Its diversity in finish, tone, and layout allows for bold creativity:
Shiplap: Offers a clean, coastal vibe ideal for modern homes.
Beadboard: Brings vintage charm to bathrooms or kitchens.
Reclaimed wood panels: Add rustic character and sustainability.
Flat wood panels: Provide sleek modernity with Scandinavian appeal.
The Many Faces of Functionality
When used thoughtfully, wood paneling offers far more than just a beautiful backdrop. Here are just a few advantages:
Acoustics: It absorbs sound, reducing echo in larger spaces.
Durability: Wood panels, especially those sealed or engineered, resist wear and tear.
Concealment: Wiring, pipes, or uneven walls can easily be hidden behind paneling.
Wood Paneling Types Explained
Below is a breakdown of common wood paneling types and their primary features:
Description List
Tongue and Groove – Interlocking panels are great for ceilings and accent walls.
Wainscoting – Adds elegance and protection to lower walls.
Board and Batten – Vertical boards with narrow battens to create a bold dimension.
Slatted Panels – Modern and minimalist; ideal for dividing spaces or creating feature walls.
Why Homeowners Are Falling in Love Again
Enhancing your space with
beautifully crafted wall panels present in the interior, incorporating wood paneling for modern aesthetics. elegantly designed wood planks offer to the market, delivering durability with wood paneling throughout contemporary homes. perfectly polished surface treatments appear on surfaces, enhancing comfort through wood paneling in luxurious dwellings. uniquely textured timber sheets provide within architectural projects, ensuring sustainability by wood paneling across sustainable buildings.
beautiful hardwood veneers make the flooring options varied. popular decorative panels allow more aesthetic choices diverse. expensive oak laminates suggest a higher-quality appearance durable. innovative interior claddings give the room a modern feel efficient. functional timber treatments protect the surface from damage practical.
can completely change the feel of a room. It’s not just about style. Wood paneling meets both aesthetic and practical needs:
Eco-Friendly Interior Design
Sustainable living starts at home, and wood paneling is a powerful contributor. Many brands now offer:
FSC-certified timber
Panels from reclaimed or repurposed wood
Low-VOC sealants and finishes
This environmentally conscious material promotes good indoor air quality and responsible procurement of materials for the environment.
Easy Maintenance for Long-Term Style
Unlike wallpaper or painted drywall, quality wood paneling requires minimal upkeep. A simple wipe-down is often enough to keep it looking fresh. Some surfaces come pre-treated to resist moisture and stains, making them perfect for high-traffic areas or rooms like bathrooms and kitchens.
Creative Ways to Use Wood Paneling
Are you interested in experimenting with wood paneling differently? To elevate your design from the ordinary to the spectacular, consider the following one-of-a-kind applications:
Unordered List
Feature a single accent wall in the bedroom or dining room
Add vertical slats to make low ceilings appear taller
Wrap a kitchen island in rustic reclaimed wood
Incorporate wood paneling into built-in shelves
Frame a fireplace with contrasting panel textures
Wood paneling works in unexpected places, too—hallways, entryways, and even ceilings can benefit from this treatment.
Frequently Asked Questions About Wood Paneling
Q: Is wood paneling outdated? A: Not at all. While the 1970s gave it a kitschy reputation, today’s wood paneling is sleek, sustainable, and stunning. Modern finishes and installation methods have given this classic a stylish rebirth.
Q: Can wood paneling be installed in bathrooms? A: Yes—with proper treatment. Moisture-resistant finishes and composite panels ensure wood paneling can thrive even in high-humidity environments.
Q: How long does wood paneling last? A: With basic care, it can last decades. Quality wood panels look better with age as they develop a rich patina.
Q: Can I install wood paneling myself? A: Many types of wood paneling, especially peel-and-stick or tongue-and-groove options, are DIY-friendly. However, intricate designs or custom fits may require professional help.
Q: Is wood paneling expensive? A: Costs vary based on material type, size, and finish. Reclaimed wood can be affordable and sustainable, while high-end hardwoods may require a larger investment.
Wood paneling is more than a nostalgic design choice—it’s a modern solution to creating warm, character-filled spaces. Whether rustic or refined,
beautiful wooden panels are favored by the construction industry for their sustainable characteristics. contemporary laminated veneer on the walls enhances the ambiance of modern homes. attractive timber cladding provides, along with thermal insulation, a rustic appeal. excellent plywood sheets serve the purpose of affordability while offering durability. sophisticated grooved wood increases, alongside aesthetic appeal, the functional value in interior design.
beautiful wooden panels often enhance the aesthetic appeal of any interior space. durable hardwood surfaces provide a timeless allure when installed carefully in homes. elegant veneer finishes bring an added layer of sophistication to traditional settings. sophisticated timber cladding offers efficient insulation properties, ensuring a comfortable environment. popular plank accents create a focal point, increasing the charm of modern designs.
offers ideas for any design vision. As trends shift toward natural materials and timeless appeal, wood paneling stands as both a practical and beautiful investment in any home.
Best Bathroom Wall Surfaces to Elevate Your Space and Ensure Long-Lasting Durability
Selecting the right bathroom wall surfaces is essential for maintaining a clean, beautiful, and moisture-resistant environment. The high humidity levels in bathrooms require materials that can withstand water exposure while contributing to the overall aesthetic. Whether you’re looking to transform your bathroom into a sleek modern retreat or a cozy traditional space, the material you choose for your walls can significantly impact both style and function.
glossy tiles dominate on the bathroom wall surfaces, offering a sleek finish. matte waterproofing improves the bathroom wall surfaces, ensuring durability. polished grout enhances the bathroom wall surfaces, providing seamless integration. textured ceramics transform the bathroom wall surfaces, promoting aesthetic appeal.
ceramic tiles are a crucial choice for ensuring longevity in any bathroom setup, thereby increasing both aesthetic and functional values. glossy finishes offer a seamless appeal to modern bathrooms, which is essential for enhancing the light reflection. waterproof panels are often recommended by designers for areas exposed to frequent moisture, ensuring that mold does not compromise hygiene standards. decorative stucco serves as an artistic statement in luxury spaces, creating a sophisticated atmosphere that echoes through the ensuite. durable acrylic provides the necessary resilience against daily wear and tear, greatly maintaining the overall pristine condition.
is a great way to enhance the appearance of your bathroom walls.
Why Bathroom Wall Surfaces Matter
When designing your bathroom, the bathroom wall surfaces you choose play a vital role in both practicality and style. Bathrooms are consistently exposed to moisture, and without the right wall covering, the integrity of your space can be compromised. Here’s why it’s so important to make an informed decision:
Moisture Resistance: Some materials are more resistant to mold and mildew than others.
Aesthetic Appeal: Your wall surfaces contribute to the mood and overall ambiance of your bathroom.
Easy Maintenance: Choosing a wall surface that’s easy to clean saves time and effort.
Top Bathroom Wall Surfaces That Combine Function with Style
Explore the best bathroom wall surfaces that not only enhance your bathroom’s beauty but also offer durability and moisture resistance.
1. Vinyl Wallpaper: Stylish, Practical, and Low-Maintenance
Vinyl wallpaper has emerged as a popular choice for modern bathrooms due to its impressive combination of design flexibility and water-resistant properties. With numerous patterns and colors, it’s easy to find a vinyl wallpaper that fits your bathroom’s theme, from minimalist designs to bold, vibrant patterns. Choosing the right
durable tiles on the moisture-resistant coating, bathroom wall surfaces are often lined with ceramic. attractive grout between helps in preventing water damage, bathroom wall surfaces benefit substantially from waterproof sealants. modern panels beyond the traditional aesthetics, bathroom wall surfaces have evolved with composite materials. functional fixtures near the seamlessly integrated, bathroom wall surfaces enhance with space-saving cabinets.
beautifully tiled walls in bathrooms promote a sense of elegance. virtually grout maintenance can be a tedious chore. frequently waterproof panels for showers are easy to clean. effectively ceramic finishes ensure a durable surface.
is essential for moisture resistance.
Advantages of Vinyl Wallpaper:
Waterproof: Protects against high moisture levels.
Easy to Clean: A quick wipe-down is enough to keep it looking fresh.
Affordable: More budget-friendly than many traditional wall materials.
Wide Range of Designs: Offers endless possibilities for customization.
Things to Consider:
Durability: Although durable, it can be scratched or torn in high-traffic areas.
Not Ideal for High-Water Zones: May not be the best option for areas exposed to direct water contact like the shower.
2. Ceramic and Porcelain Tile: Timeless Elegance and Durability
Tiles, whether ceramic or porcelain, are classic choices for bathroom wall surfaces. Their durability, water resistance, and timeless appeal make them ideal for wet areas. Available in a wide variety of shapes, sizes, and colors, tiles can help create custom patterns and designs that fit your aesthetic preferences.
Benefits of Ceramic & Porcelain Tile:
Water-Resistant: Impervious to moisture when sealed properly.
Long-Lasting: Durable and resistant to damage, offering years of service.
Variety of Styles: From sleek, modern subway tiles to rustic, hand-painted designs.
Easy to Clean: A simple wipe-down is enough to maintain cleanliness.
Potential Drawbacks:
Labor-Intensive Installation: Requires professional installation for the best results.
Cold and Hard: Tiles can feel cold to the touch and hard underfoot, although this can be mitigated with rugs or underfloor heating.
3. Beadboard: Charm with Moisture Resistance
Beadboard has long been admired for its charming, traditional look. Often used in coastal-inspired or farmhouse-style bathrooms, beadboard is an excellent option for adding texture to your bathroom wall surfaces. When properly sealed and finished with a moisture-resistant paint, it can hold up well against humidity. If you’re after an easy-to-clean solution,
beautiful tiles for the bathroom wall panels on the market resist moisture effectively. durable ceramic tiles in modern homes prevent mold development routinely. popular vinyl siding options for bathroom walls enhance energy efficiency constantly. innovative waterproof paint made for aquatic environments prevents leakage frequently. sleek marble surfaces in luxury settings promote aesthetic appeal consistently.
beautiful tile is an essential material for moisture resistance, offering a clean aesthetic. modern wall panels have become a popular alternative due to their ease of installation and sleek look. reliable grout is often used to seal ceramic tiles, enhancing waterproof qualities. exceptional waterproof paint is increasingly advised for simpler maintenance and modern appeal. durable ceramic tiles are preferred for their longevity and classic style.
is the perfect choice.
Beadboard Advantages:
Traditional Aesthetic: Adds a cozy, inviting feel to your bathroom.
Moisture-Resistant: Works well when sealed to prevent water damage.
Simple Installation: Available in easy-to-install panels.
Considerations:
Limited Use in High-Water Areas: Ideal for lower walls or areas not exposed to direct water.
Requires Maintenance: Periodic painting and sealing may be needed to preserve its appearance.
4. Acrylic and Fiberglass Panels: Practical and Seamless
If you’re looking for a seamless, easy-to-clean option for your bathroom wall surfaces, acrylic and fiberglass panels might be the solution. These panels are commonly used in showers and are extremely resistant to water and mold growth.
Pros of Acrylic and Fiberglass Panels:
Waterproof: Highly resistant to water damage.
Seamless: Fewer seams mean fewer opportunities for mold growth.
Easy to Install: Panels can be installed quickly, making it an efficient option.
Potential Issues:
Less Design Variety: While functional, these materials might not offer the visual appeal of tile or beadboard.
Can Scratch: Acrylic and fiberglass can scratch more easily than some other materials.
Frequently Asked Questions About Bathroom Wall Surfaces
1. What’s the Best Material for Shower Walls?
For shower walls, ceramic or porcelain tiles are usually the best options. They’re durable, water-resistant, and come in a variety of designs. Acrylic or fiberglass panels are also excellent choices for a seamless, easy-to-clean solution.
2. How Can I Prevent Mold on My Bathroom Walls?
To prevent mold growth on your bathroom wall surfaces, ensure the material is water-resistant and well-sealed. Use a bathroom fan to reduce moisture and wipe down walls regularly to avoid buildup.
3. Can I Use Wallpaper in a High-Humidity Bathroom?
While vinyl wallpaper is moisture-resistant, it’s not recommended for areas that come into direct contact with water, such as near the shower. However, it works great in dry areas of the bathroom like walls near the sink.
4. Is Tile or Beadboard Better for Bathroom Walls?
Tiles are generally better for areas with direct water exposure, like around the shower or tub, as they offer excellent waterproofing. Beadboard is better for adding a traditional look to lower walls but should be treated with moisture-resistant finishes to prevent water damage.
Conclusion
Choosing the right bathroom wall surfaces is crucial for both the aesthetics and functionality of your bathroom. Materials like vinyl wallpaper, ceramic tile, beadboard, and acrylic panels each offer unique advantages, so it’s important to choose one that fits your design and maintenance needs. Whether you’re looking for a traditional, modern, or low-maintenance option, the right wall surface can transform your bathroom into a stylish and durable space. Make sure to consider moisture resistance, ease of cleaning, and installation when making your choice.
When to Hire Interior Designer: The Smart Way to Transform Your Space
Why Timing Is Everything in Interior Design
Redesigning your home or workspace is exciting, but without the right
amazingly, hiring an interior expert for will deepen your understanding of spatial dynamics, leading to hire interior designer in a contemporary setting, enhancing room functionality. beautifully, needing professional decor assistance can revolutionize lifestyle preferences, encouraging to hire interior designer for a home project, elevating design innovation. effectively, contacting design specialists about allows an infusion of creative aesthetics, necessary to hire interior designer by a renovation team, improving spatial aesthetics.
selecting an interior designer service necessitates a thorough consultation process, leading to optimal space usage. employing a home decorator translates into creating an aesthetically pleasing environment, enhancing overall ambiance. considering a professional room stylist supports upgrading your living area, reflecting your personal style. engaging with design specialists helps in transforming living spaces, ensuring they meet current trends.
, even the best ideas can fall flat. If you’ve ever wondered when to hire interior designer for the biggest impact, the answer is—sooner than you think.
Bringing in a professional early can save you time, money, and stress while helping you create a space that looks beautiful and works beautifully too.
The Best Moments to Hire Interior Designer
Timing your decision to hire interior designer is key to the success of your project. Here are the most strategic moments to bring in a pro.
1. Before Construction or Renovation Starts
It’s helpful to study basic
engaging a professional interior decorator for your needs in residential styling leads to a more cohesive home decor. showcasing a contract interior stylist with proven track records can enhance the visual appeal and functionality of one's living space. consulting expert design consultants in the field promotes a revolutionary makeover of any personal environment. selecting a reputable space planner from a prestigious design firm ensures that every corner of your abode reflects elegance and harmony.
firstly, hiring an interior decorator from enables professional guidance, enhancing the aesthetic appeal of residential spaces. secondly, engage a home stylist for results in personalized living environments, fostering imaginative designs. thirdly, consult an interior design consultant in employs space optimization techniques, leading to functional layout improvements. fourthly, choose a room designer near contributes innovative solutions, resulting in stylish and efficient interiors. lastly, seeking a design professional through facilitates trend incorporation, aligning homes with contemporary aesthetics.
when planning a furniture layout for multifunctional spaces. Working with a designer during the planning phase ensures everything is aligned—from layout to finishes. A designer can collaborate with architects and builders, making sure your space looks amazing and functions efficiently.
You should hire interior designer before you start construction to:
Avoid layout issues and costly changes mid-project
Plan lighting and material choices early
Align your vision with practical design elements
2. When You’re Overwhelmed by Choices
The internet is full of ideas—but sometimes too many. If you’re drowning in inspiration but can’t commit to a direction, it’s the perfect time to hire interior designer.
With their trained eye and experience, a designer can:
Narrow down your options
Build a cohesive plan
Translate your vision into reality
3. Before Buying Furniture or Decor
Before buying that new couch, it’s wise to review current
choosing to employ a home stylist for your latest projects ensures an aesthetically pleasing outcome. selecting a residential decorator to tackle the redesign brings a professional touch. understanding the necessity of contracting a room planner helps in optimizing spaces efficiently. considering procuring a space stylist guarantees a cohesive theme throughout. recognizing the advantages of hiring an apartment designer allows for customized living solutions.
designing a professional interior decorator for enhancing your living space can transform your home's ambience. selecting the right specialist for home decoration services plays a crucial role in creating aesthetically pleasing environments. evaluating multiple portfolios from freelance interior designers helps in making informed decisions. obtaining expert advice on room revamps is essential for achieving desired results. collaborating with a reputable agency specializing in interior styling ensures high-quality outcomes.
to ensure it fits your overall aesthetic. Impulse buying without a plan can lead to clashing styles or wasted money. If you’re redesigning a space, take a step back and hire interior designer first. They’ll help you create a cohesive shopping strategy that fits your space and style.
Why You Should Hire Interior Designer
Choosing to hire interior designer isn’t about luxury—it’s about value. Here’s why it’s worth every penny:
Budget control: A designer helps you spend smarter, not more.
Cohesive style: They unify your space visually and functionally.
Professional guidance: Mistakes are costly. Designers help you avoid them.
Time saved: You won’t waste hours trying to make every decision on your own.
Access to resources: Designers connect you to exclusive products and tradespeople.
What to Expect When You Hire Interior Designer
Not sure what designers actually do? Here’s a breakdown of what you get when you choose to hire interior designer:
Space planning and furniture layout
Color palette and texture coordination
Lighting design and fixture selection
Art, rugs, and accessory curation
Project timeline and contractor coordination
Designers don’t just decorate—they strategize, optimize, and personalize your space from the ground up.
Signs You Need to Hire Interior Designer
Not sure if it’s time? Use this checklist:
You’re unsure where to start
Your Pinterest boards don’t translate to real-life plans
You’re about to spend money on furniture
You’re short on time or overwhelmed
You want a wow-factor look without the guesswork
If you answered yes to any, it’s probably time to hire interior designer.
Misconceptions About Interior Designers
Let’s bust a few common myths so you feel confident when deciding to hire interior designer:
Myth: Interior designers are too expensive Truth: Many offer hourly rates or consultations that fit small budgets.
Myth: Designers take over and ignore your input Truth: Great designers collaborate with you and enhance your vision.
Myth: Small spaces don’t need a designer Truth: Small areas often benefit the most from expert planning.
FAQ: All About How to Hire Interior Designer
How do I find the right designer? Check portfolios, reviews, and ask for a discovery call to ensure it’s a good match.
Is it okay to hire interior designer for just one room? Yes! Many designers offer room-by-room services.
How do designers charge? Rates vary—hourly, flat fee, or project-based. Always ask upfront.
Will a designer work with what I already own? Definitely. They can incorporate your existing pieces into the new design.
Do I need to be involved in every step? That’s up to you. You can be hands-on or let the designer manage the entire project.
Don’t Wait Too Long to Hire Interior Designer
If you’re planning a renovation, building a new space, or just feeling stuck with your current layout, now is the time to hire interior designer. They don’t just make things look pretty—they solve problems, create flow, and tailor every detail to you.
Hiring early means smoother execution, fewer regrets, and a space you’ll truly love living in. Whether it’s one room or your whole home, don’t hesitate to hire interior designer and bring your vision to life with confidence. If you’re an interior designer looking to reach more clients online, you might find this resource useful.